WebSharper CRUD patterns
This post is part of the F# Advent Calendar in English 2023 organised by Sergey Tihon. After years of being an avid reader, I’m happy to participate this year. Thanks you Sergey for organising this!
Functionality introduction
MyOwnDB’s UI is developed with WebSharper, and in the course of its development, I repeatedly used the same approach when the need arose to manage items like databases, users, etc… The operations implemented are the so-called CRUD operations, for Create-Read-Update-Delete.
For pages proposing these operations, I always ended up with the same features. Let’s take a look at these when managing users. We need to:
- Display the list of existing users in a table
- Allow the creation of a new user. The form to create the user is only shown after the admin clicks a button. When the form is submitted, the newly created user is added to the list
- Allow the edition of an existing user. By clicking an “edit” icon in the user’s row, the edition form is shown. When the edition form is successfully submitted, the edited user’s table row is updated accordingly.
- Allow the deletion of an existing user.
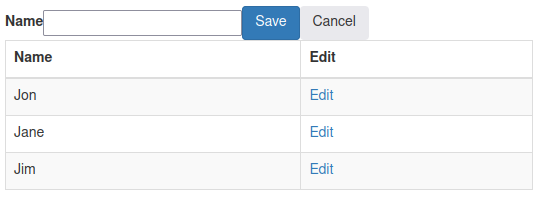
We will skip the delete operation in this post. Here is a screenshot of the example application we will use:

We see:
- a button to trigger the display of the form to create a user
- a table listing existing users
- each row of the table having a column for editing the user
Clicking on the Add new button triggers the display of the form:
and clicking an edition icon in the table shows the same form, but prefilled:
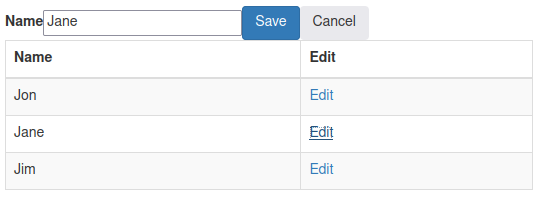
Clicking on the Save saves the data, hides the form, and updates the table.
This post will focus on the client-side of the functionality. It is describing the features as implemented in an example app. This example app implements a minimal in-memory datastore so you can run the app without any dependency. We will not focus on the server side, which is kept minimal.
With the functionalities having been described, we will now take a look at WebSharper concepts we will use. If you already know WebSharper, you can probably go straight to the implementation.
WebSharper concepts
The power of WebSharper for building dynamic web UIs comes mainly from its reactive vars, which are described in the doc as:
Vars are similar to F# ref<’T> in that they store a value of type ’T that you can get or set using the Value property. But they can additionally be reactively observed or two-way bound to HTML input elements.
Observing a Var is done through its View, described as:
A View<’T> is a time-varying value computed from any number of Vars and other Views, and its value automatically changes each time any of those dependencies change.
As mentioned, a View can be obtained:
-
from a
VarwithmyVar.View -
from another view with
myView |> View.Map (fun currentValueOfMyView -> ....) -
from multiple other views, for example
View.Map2 (fun v1 v2 -> ...) myView1 myView2
Vars and Views are a basic building block in WebSharper. As such they are also used by the HTML generation functions included in WebSharper.
For example a form input field is linked to a Var whose values is continually kept in sync with the html input field.
On the other hand, a view can be integrated in the UI, the UI being updated every time the View’s value changes.
To keep it short regarding HTML generation, each element in an HTML document is a WebSharper Doc, and functions are available to create a Doc for most existing nodes, like for example the function div.
These functions take as argument a list of attributes, and a list of children Docs, which lets you create the HTML you want.
div
    [ attr.id "out-div"]
    [
        div
            [attr.id "in-div"]
            [
                // Note that "hello" is a string, and not a Doc
                // so we need to convert it to a Doc by passing it to the function text
                span [] [text "hello"]
            ]
    ]
For more complex documents, it is recommended to work with templates. But this is not what we will do in this example.
As mentioned before, we will display a list of existing users, and WebSharper proposes helpers to work with lists. Rather than working with a list of Vars, we will work with a Var of a list, with additional custom features, called a ListModel<'K,'T>, storing a list of objects of type 'T identified by a value (an id) of type 'K.
Laying the foundations
You can find all the code in a runnable app at https://gitlab.com/myowndb/websharper-crud. Each code excerpt will first be listed, then explained. We will look at a basic solution to highlight the approach taken, but some BONUS code will also be mentioned and linked to without a precise explanation, to keep this post of a reasonable size.
- The commit introducing this step's code is here on gitlab
- You can browse the files of the app on gitlab
Initialisation
We start by initialising variables:
        // Get the users from the server
        let! users = Server.GetUsers()
        // Create a ListModel, using the user's id as identifier.
        // We initialise the ListModel with an empty list
        // Notice this is totally independent from the retrieval of users from the server
        let usersCollection =
            ListModel.Create
                (fun (u:DataStore.User) -> u.id)

                []
        // A Var holding some feedback to the user
        let resultVar = Var.Create Doc.Empty
we setup 3 variables:
-
users: the users lists result retrieved from the server, which is aResultvariable (eitherOkwith a list of users, orError).Server.GetUsers()is a server side function annotated with[<Rpc>], which makes it callable from the client side. WebSharper takes care of serialisation when sending the call and retrieving the result value. -
usersCollection: theListModelthat will hold the users list we will display in the table. It is initialised empty, with a function mapping a user entry to its id. -
resultVar: aVarcontaining aDocgiving feedback to the user. It is initialised with the valueDoc.Empty, as we do not have any feedback to give yet. We will see below how it is integrated in the UI.
Handling retrieved data
The code until now retrieved data from the server, but didn’t check we got a successful result or an error. Let’s do it now:
            match users with
            // If successful, update the ListModel
            | Ok l ->
                usersCollection.Set l
            // In case of error, empty the ListModel and notify user
            | Error es ->
                resultVar.Set(
                  div [] [text "Error retrieving users"]
                )
-
in case of success, we update the
ListModelby setting its list. This removes any previously data stored in theListModel. - conversely, in case of error, we display an error text.
Building the table
We have the ListModel, but now we need to build the HTML table from it. Here’s how (with superfluous info like CSS classes removed):
        let usersTableView =
          usersCollection.View
          |> View.Map
              (fun l ->
                table
                    []
                    [
                        thead []
                              [ tr []
                                   [ th [] [ text "Name" ] ]
                              ]
                        tbody []
                              (
                                l |> Seq.map ( fun u ->
                                        tr
                                            []
                                            [ td [] [text u.name] ]
                                    )
                              )
                    ]
              )
We start by taking a view of the ListModel and map the view the a Doc which is the HTML table listing users. The function doing the mapping takes as argument a sequence of the users, and subsequently builds the HTML table, building one row per user.
Take a moment to realise we work on the view. This means that everytime the usersCollection is updated, the usersTableView that we will include in the UI, will automatically be recomputed. You should start to see why Vars and Views are so interesting :-)
Though note we can do better: with this code, everytime one entry of the usersCollection is modified, the whole table is re-rendered. This is easy to fix. To re-render only required rows, see the corresponding BONUS below.
Building the UI
We now have all elements to build the UI, so let’s do it:
          div
            []
            [
              resultVar.V
              usersTableView.V
            ]
We just combine the Views we have in a div. The V method is a shorthand which in this case lets us use a View<Doc> where a Doc is expected. Using a view here means that each time that view is updated, the document will also be updated to reflect the view’s new value.
The app currently just displays a table of users, but we built a solid foundation for the next features.
Creating users
- The commit introducing this step's code is here on gitlab
- You can browse the files of the app on gitlab
Until now, we only worked with users retrieved from the servers. Those were of the type
type User = { id: int; name:string}
Each user has an id, which in this case is an int. However, when adding users, we will work with users that need to be created, and that do not have an id yet.
It appeared useful to define second type we call UserSpec:
type UserSpec = {id: int option; name:string}
Its id field is now an option: a UserSpec with id None is a user that is not yet saved in the database.
Initialisation of variables
We will need to keep track of the user to be added, and create a Var for that:
let editedUser:Var<Option<DataStore.UserSpec>> = Var.Create None
We define editedUser of the type Var<Option<UserSpec>>. When this Var has a value None, it means we don’t work on a UserSpec and the form can be hidden. If the Var is Some userSpec however, it means we work on a UserSpec instance, and the form needs to be displayed.
Note that the Var wraps a record type. It was mentioned earlier that a form input field can be bound to a Var, but that Var must wrap a value of a type compatible with the input field in questions. For an text input, for example to enter the user’s name, we need a Var<string>. But what we have is a Var<UserSpec>! The solution here is Lenses. It lets us, in this case, define a Var<string> that is derived from the Var<UserSpec>, by zooming on its name field:
let name:Var<string> = u.LensAuto (fun u -> u.name)
Assigning a new value to name will update the Var<UserSpec>. This will let us use the name variable in an input field, but still have the Var<UserSpec> up to date without having to take any action!
Building the form elements
We start by defining a function building the form for a UserSpec instance:
         let editionFormForUser (user:DataStore.UserSpec) =
            // Put the user in a var so we can create lenses on its fields
            let u = Var.Create user
            // Create a lens on the name, giving us a Var we can use in the form field
            let name =
                u.LensAuto (fun u -> u.name)
            // Define the form element
            form
                [ attr.id "admin_users_form"]
                [
                    // Name input field and its label
                    label [attr.``for`` "userEditionName"] [text "Name"]
                    Doc.InputType.Text [attr.id "userEditionName"] name
                    // Submit button with its label, attributes, and callback
                    Doc.Button
                        "Save"
                        []
                        (fun () ->
                           async {
                                    // u.Value gives the current value of the Var u
                                    let! r = Server.addUser u.Value
                                    match r with
                                    | Ok userFromServer ->
                                        // We get the updated user back, inject it in the users collection used to display the table
                                        // Add updates an existing entry
                                        usersCollection.Add userFromServer
                                        // Notify of the success
                                        resultVar.Set (div [] [text "UpdateSuccessful"])
                                        // Get out of user edition, hiding the form
                                        editedUser.Set None
                                    // This Ok l should not happen as single row  result is ensured server side
                                    | _ ->
                                      resultVar.Set (div [] [text "An error occured"])
                            }
                            |> Async.Start
                        )
                    // Cancel button
                    Doc.Button
                        "Cancel"
                        []
                        // Cancelling is simply going to a state where no user edition is done
                        (fun () -> editedUser.Set None)
                ]
Here’s what’s going on in this function:
-
As the only editable user attribute is the name, we create a
Varby lensing on the name field of theUserSpec. Doing that we have aVar<string>we can use with an input field, and we have theVar<UserSpec>kept up to date. -
We then define the form and the input field for the name. Note that the last argument of the call to
Doc.InputType.Textisname, ourVar<string>. This means that the input field is initialised with the value of theVarname, and that when the user types in the field,nameis automatically updated, which is also reflected in theVar<UserSpec>namewas derived from. For the sake of completeness, know that as we will handle all communication with the server, the form will never be submitted and could be replaced by adiv. -
We also add a submit button. The interesting bit here is its onclick callback, passed as third argument. This callback calls the server side function
Server.addUserwith the currentUserSpecstored in theVaru. -
It is when we get the response from the server that we need to update the users list displayed. As the server returns a
Result<User>, this is very easy: calling theListModel‘sAddmethod is all we need to do. As theListModelis updated, its view is as well, which triggers an update of all its derived views (eg resulting from aView.Map). As our html table is constructed by mapping theusersCollectionView(seeusersTableView), this will trigger an update of the html table listing the users. There’s nothing else to be done. -
As the edition is finished, we call
editedUser.Set None. This is also done when the edition is cancelled (see the Cancel button)
At this point, we have a function that will return a Doc when given a UserSpec. But remember that we want the form to be displayed only when a user is edited before creation. When no edition is ongoing, we want the form to be hidden.
We have a Var called editedUser that is None when we don’t define a new user, but is Some userSpec when we do. So the display of the form will be done by mapping the view of editedUser to a View<Doc>. Here’s the code:
        let editionformView =
            editedUser.View
            |> View.Map (fun uo ->
                match uo with
                | None -> Doc.Empty
                | Some u -> editionFormForUser u
When we are not adding a user, the editionFormView is a View of an empty Doc, otherwise it is a view of the form Doc returned by editionFormForUser. We just have to include this view in the page.
But before doing that, we also need to add a button triggering the display of the form:
        let addButton =
            Doc.Button
                "Add new"
                [attr.``class`` "btn btn-primary"]
                (fun () ->
                    resultVar.Set Doc.Empty
                    editedUser.Set (Some(DataStore.UserSpec.Init())))
Clicking this button will reset the feedback possibly given to the user, and set editedUser to a freshly initialised UserSpec of the value { id = None; name = "" }. Doing that will trigger the display of an empty form.
Building the UI
As we have all UI elements available, we can now integrate them in our UI:
        div
            []
            [
              resultVar.V
              addButton
              editionformView.V
              usersTableView.V
            ]
The add button is a Doc and can be used as is. However our form is a view, so we access the V property to add it as a child node that will continuously be kept up to date.
User edition
- The commit introducing this step's code is here on gitlab
- You can browse the files of the app on gitlab
UserSpec instance into editedUser. In our case, getting the UserSpec from a User can be done by adding a member to the User type:
  type User = { id: int; name:string}
  with
    member self.toSpec() : UserSpec =
      { id= Some (self.id); name = self.name}
In the table, we add a column to trigger the edit of a user:
    td
        [ on.click (fun _el _ev -> editedUser.Set (u.toSpec()|> Some))]
        [a [attr.href "#"] [text "Edit"]]
A click in that table cell will assign to editedUser the spec of the user of the current line, triggering the display of the form filled with that user’s information.
You might have to implement the update of a user on the server side, but as the UserSpec specifies the id field as being an option, you probably already handled this at the previous step, as I did in my code:
    match userSpec.id with
          | Some existingId -> // update user
          | None -> // Create user
The patterns
Here are the take-aways from this post, which I dare calling patterns to follow :-)
-
When displaying a list of items that can be updated, use a
ListModel -
Define a distinct type for the data handled by the form (
UserSpec) from the data extracted from the database (User). -
In the
UserSpectype, use anOptiontype for the id field. This change lets us use the same code client-side for edition and addition, but provides the necessary clues to the server for deciding to apply an update or a creation. -
Toggle the display of the form based on the value of an
editedUservariable of typeOption<UserSpec>, which is also used to fill the form in the case of edition. -
Define a
UserSpec.initto be used as the value assigned toeditedUserwhen creating a new user. -
Define a
User.toSpecto facilitate the assignment toeditedUserwhen editing an existing user.
Following these patterns will let you focus on the features to be implemented, and work step by step, knowing what path to follow to completion.
Bonuses
Rendering only modified rows
- The commit introducing this step's code is here on gitlab
- You can browse the files of the app on gitlab
ListModel is changed. This is because we observe the ListModel View and build the whole table from it.
It is easy to improve this and only re-render the modified rows. The trick is to do the mapping at the row level by calling the method DocSeqCached on the ListModel‘s View property. This method takes a one argument function, which is a user from the ListModel, and has to return a Doc, the table’s row corresponding to the user.
Updating the “Add new” button’s label
- The commit introducing this step's code is here on gitlab
- You can browse the files of the app on gitlab
Inform if we edit or add a user
- The commit introducing this step's code is here on gitlab
- You can browse the files of the app on gitlab
Conclusion
We have seen how we can build a dynamic Web UI with WebSharper. Using Vars and Views, we can focus on just updating the state of our app, and see the UI be updated automatically.
I hope this gave you an idea of the power of the concepts on which WebSharper’s reactive UI library is built.